Wednesday, September 24, 2014

Monday, March 10, 2014
Lets start to use GITHUB !
Why use something like Git? Say you and a coworker are both updating pages on the same website. You make your changes, save them, and upload them back to the website. So far, so good. The problem comes when your coworker is working on the same page as you at the same time. One of you is about to have your work overwritten and erased.
A version control application like Git keeps that from happening. You and your coworker can each upload your revisions to the same page, and Git will save two copies. Later, you can merge your changes together without losing any work along the way. You can even revert to an earlier version at any time, because Git keeps a “snapshot” of every change ever made.
You have to Download GitHub at first.
Here is all common command of Github bash. So have a look before starting work. Don't need to afraid seeing lots of command !
CREATE
Clone and existing repository
$ git clone ssh://user@domain.com/repo.git
Create a new local repository
$ git init
LOCAL CHANGES
Changes files in your working directory
$ git status [Get used to this command after every action]
Add all current changes to the next commit
$ git add .
Add some changes in <file> to the next commit
$ git add -p <file>
Commit all local changes in tracked files
$ git commit -a
Commit previously staged changes
$ git commit
COMMIT HISTORY
Show all commits, starting with newest
$ git log
Show changes over time for a specific file
$ git log -p <file>
Who changed what and when in <file>
$ git blame <file>
Branches & tags
List all existing branches
$ git branch
Switch HEAD branch
$ git checkout <branch>
Create a new branch based on y our current HEAD
$ git branch <new-branch>
Create a new tracking branch based on a remote branch
$ git branch --track <new-branch> <remote-branch>
Delete a local branch
$ git branch -d <branch>
Mark the current commit with a tag
$ git tag <tag-name>
Update & Publish
List all currently configured remotes
$ git remote -v
Show information about a remote
$ git remote show <remote>
Add new remote repository , named <remote>
$ git remote add <remote> <url>
Download all changes from <remote>, but don‘t integrate into HEAD
$ git fetch <remote>
Download changes and directly merge/ integrate into HEAD
$ git pull <remote> <branch>
Publish local changes on a remote
$ git push <remote> <branch>
Delete a branch on the remote
$ git push <remote> :<branch>
Publish y our tags
$ git push --tags
Merge & Rebase
Merge <branch> into y our current HEAD
$ git merge <branch>
Rebase y our current HEAD onto <branch>
Don‘t rebase published commits!
$ git rebase <branch>
Abort a rebase
$ git rebase --abort
Continue a rebase after resolving conflicts
$ git rebase --continue
Use y our configured merge tool to solve conflicts
$ git mergetool
Use y our editor to manually solve conflicts and (after resolving) mark file as resolved
$ git add <resolved-file>
$ git rm <resolved-file>
Undo
Discard all local changes in y our working directory
$ git reset --hard HEAD
Discard local changes in a specific file
$ git checkout HEAD <file>
Revert a commit (by producing a new commit with contrary changes)
$ git revert <commit>
Reset y our HEAD pointer to a previous commit
…and discard all changes since then
$ git reset --hard <commit>
…and preserve all changes as unstaged
changes
$ git reset <commit>
…and preserve uncommitted local
changes
$ git reset --keep <commit>
How you will use GitHub bash :

After installing go to the directory where you want to keep the source control of your project. Press your mouse right option and press git bash. Write down " git init " . It will create git initialize for that folder.
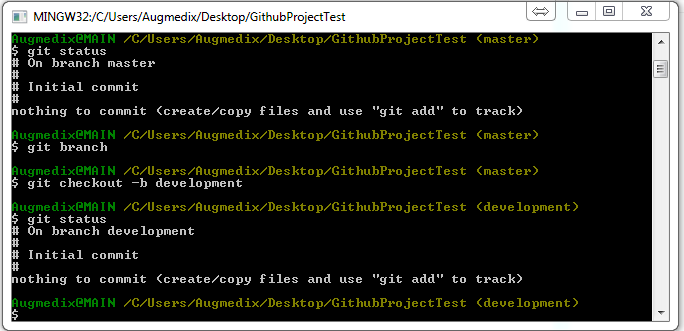
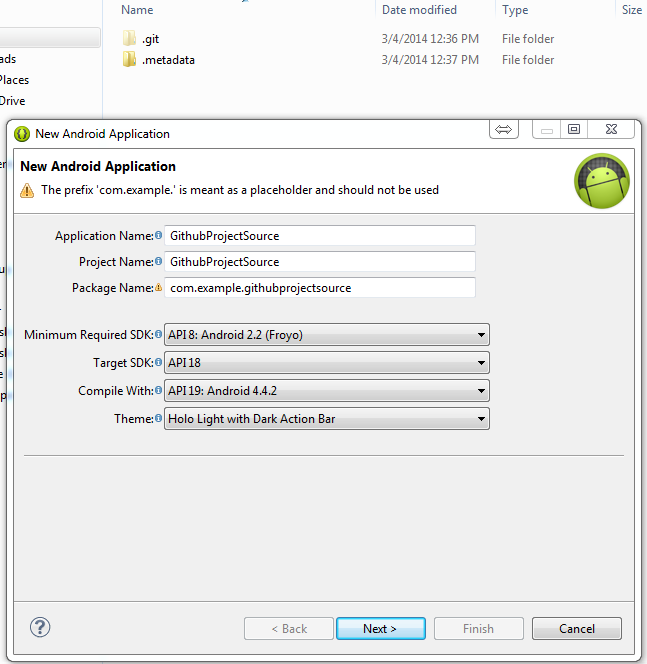

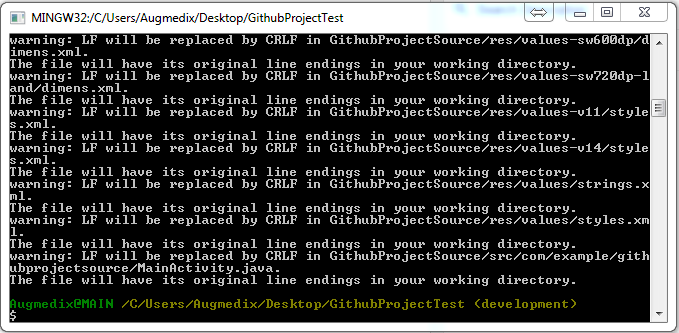

Now open a new project. After new project write down git status. As you have create a new project you will see that project untracked. You can add all the file using " git add . " . Now you can check the status using " git status ". You will see all files has been added.
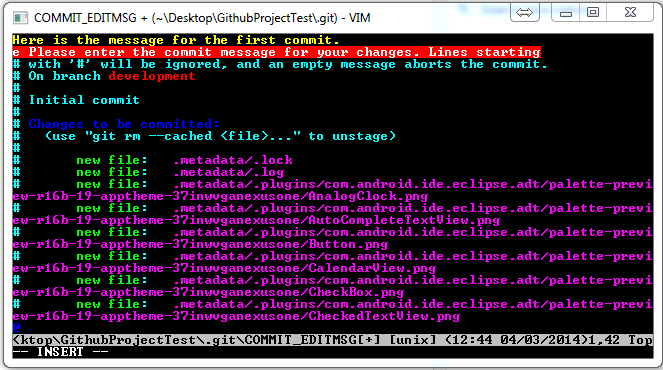
If its seems to you everything is okay for making one version for the project then write down " git commit ". You will get prompt for writing message for that specific commit. After completing message press Esc and write down :wq to go back to the command line.


If you want to show changes over time for a specific file " git log -p <filename> " .
Press tab after -p you will get suggestion from cmd prompt for the folder or file. It will save your time to write in down the foldername and filename also it will minimize the error on writing.
IMPORTANT : To back to the bash command press Esc and write down :wq .


If you want to check all the branches use " git branch " . If you want to switch to head branch " git checkout master " .

Sometimes its necessary to show branch with details. To show details use " git show-branch --list " . If you need all commit with details with some excellent color theme you can use " git log --graph git log --graph --full-history --all --pretty=format:"%h%x09%d%x20%s" "
With colors (if your shell is Bash): " git log --graph --full-history --all --color \ --pretty=format:"%x1b[31m%h%x09%x1b[32m%d%x1b[0m%x20%s" "

If you need to delete a local branch use " git branch -d <branch-name> " . You canmark the current commit with a tag. To tag the current commit you have to use " git tag <tag-name> " .
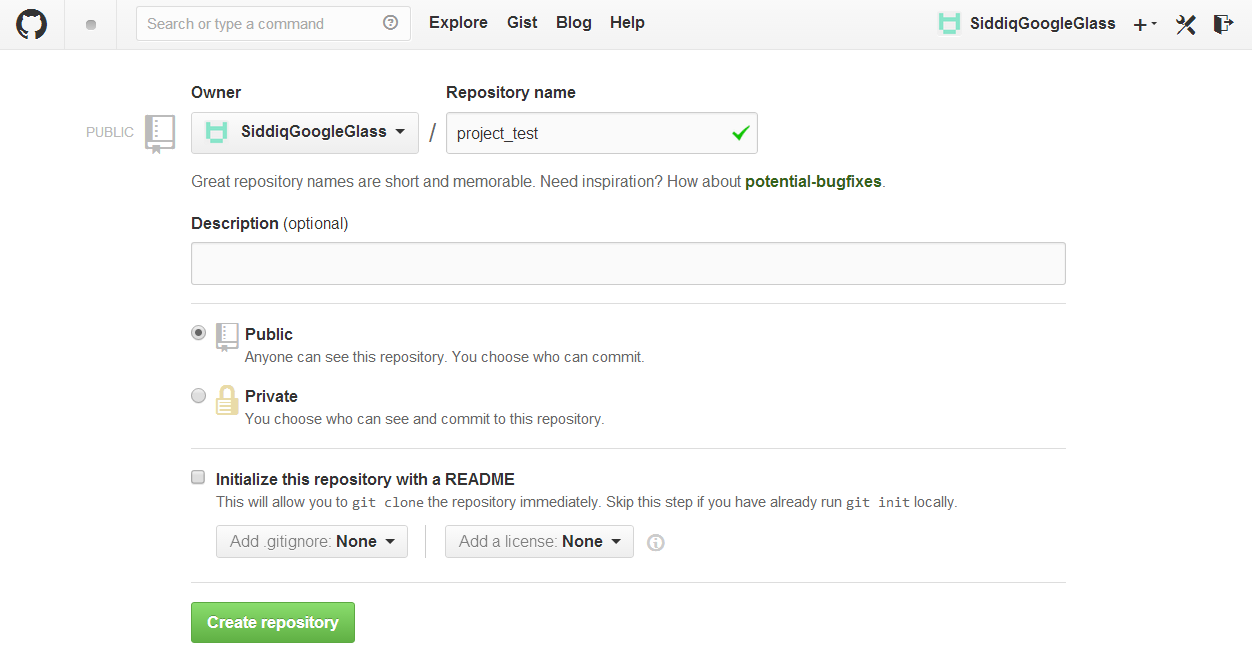
Create a repository on your github account.

Add a new remote repository using
" git remote add origin https://github.com/SiddiqGoogleGlass/project_test.git "

Now you can push your code to the server using " git push -u origin master " . Make sure you are in same branch name. As you are trying to push origin master so you have to checkout to master branch in local and push from that branch.

Now you will see the updated code has been pushed to the github server.


After clone successful your team member will get success message. After that what you need to do first is " git status " . After that create one branch for local github like " local_development " using " git branch local_development ". Then checkout to that local_development using " git checkout local_development " . Now your team member can work on that branch to track his/her code.
If you or your team member need to get the older code that have cloned or coded or other branch code then just checkout to that branch and you will get the exact code of that branch in your source code.
Awesome !!! Now you and your team members can code at same time without any hassle. Happy coding!
Best practices you should follow :
Commit related changes
Commit often
Don't commit half-done work
Test code before you commit
Write good commit message
Use branches
Agree on a workflow
Some exception you will get :
1. Pushing to Git returning Error Code 403 fatal: HTTP request failed
http://stackoverflow.com/questions/7438313/pushing-to-git-returning-error-code-403-fatal-http-request-failed clear will clear the cmd prompt screen
Help & Documentation
Git help on the command line
$git help <command>
Official git website
www.git-scm.com
Free online resources
www.progit.org
bookgit.git-scm.org
www.gitref.org
A version control application like Git keeps that from happening. You and your coworker can each upload your revisions to the same page, and Git will save two copies. Later, you can merge your changes together without losing any work along the way. You can even revert to an earlier version at any time, because Git keeps a “snapshot” of every change ever made.
You have to Download GitHub at first.
Here is all common command of Github bash. So have a look before starting work. Don't need to afraid seeing lots of command !
CREATE
Clone and existing repository
$ git clone ssh://user@domain.com/repo.git
Create a new local repository
$ git init
LOCAL CHANGES
Changes files in your working directory
$ git status [Get used to this command after every action]
Add all current changes to the next commit
$ git add .
Add some changes in <file> to the next commit
$ git add -p <file>
Commit all local changes in tracked files
$ git commit -a
Commit previously staged changes
$ git commit
COMMIT HISTORY
Show all commits, starting with newest
$ git log
Show changes over time for a specific file
$ git log -p <file>
Who changed what and when in <file>
$ git blame <file>
Branches & tags
List all existing branches
$ git branch
Switch HEAD branch
$ git checkout <branch>
Create a new branch based on y our current HEAD
$ git branch <new-branch>
Create a new tracking branch based on a remote branch
$ git branch --track <new-branch> <remote-branch>
Delete a local branch
$ git branch -d <branch>
Mark the current commit with a tag
$ git tag <tag-name>
Update & Publish
List all currently configured remotes
$ git remote -v
Show information about a remote
$ git remote show <remote>
Add new remote repository , named <remote>
$ git remote add <remote> <url>
Download all changes from <remote>, but don‘t integrate into HEAD
$ git fetch <remote>
Download changes and directly merge/ integrate into HEAD
$ git pull <remote> <branch>
Publish local changes on a remote
$ git push <remote> <branch>
Delete a branch on the remote
$ git push <remote> :<branch>
Publish y our tags
$ git push --tags
Merge & Rebase
Merge <branch> into y our current HEAD
$ git merge <branch>
Rebase y our current HEAD onto <branch>
Don‘t rebase published commits!
$ git rebase <branch>
Abort a rebase
$ git rebase --abort
Continue a rebase after resolving conflicts
$ git rebase --continue
Use y our configured merge tool to solve conflicts
$ git mergetool
Use y our editor to manually solve conflicts and (after resolving) mark file as resolved
$ git add <resolved-file>
$ git rm <resolved-file>
Undo
Discard all local changes in y our working directory
$ git reset --hard HEAD
Discard local changes in a specific file
$ git checkout HEAD <file>
Revert a commit (by producing a new commit with contrary changes)
$ git revert <commit>
Reset y our HEAD pointer to a previous commit
…and discard all changes since then
$ git reset --hard <commit>
…and preserve all changes as unstaged
changes
$ git reset <commit>
…and preserve uncommitted local
changes
$ git reset --keep <commit>
How you will use GitHub bash :
Now write down " git status "you will see you are on the master branch.
Now open a new project. After new project write down git status. As you have create a new project you will see that project untracked. You can add all the file using " git add . " . Now you can check the status using " git status ". You will see all files has been added.
If its seems to you everything is okay for making one version for the project then write down " git commit ". You will get prompt for writing message for that specific commit. After completing message press Esc and write down :wq to go back to the command line.
You can show all the commits , starting with newest using " git log " .
If you want to show changes over time for a specific file " git log -p <filename> " .
If you want to see who changed what file and when use " git blame <filename> " .
Sometimes its necessary to show branch with details. To show details use " git show-branch --list " . If you need all commit with details with some excellent color theme you can use " git log --graph git log --graph --full-history --all --pretty=format:"%h%x09%d%x20%s" "
With colors (if your shell is Bash): " git log --graph --full-history --all --color \ --pretty=format:"%x1b[31m%h%x09%x1b[32m%d%x1b[0m%x20%s" "
If you need to delete a local branch use " git branch -d <branch-name> " . You can
Create a repository on your github account.
Add a new remote repository using
Now you can push your code to the server using " git push -u origin master " . Make sure you are in same branch name. As you are trying to push origin master so you have to checkout to master branch in local and push from that branch.
Now you will see the updated code has been pushed to the github server.
You will get the HTTPS clone URL from here the github server. Now another developer of your team can work on this repository. To work on this repository at first need to clone the project. Your co-developer can clone the project using " git clone <repo-url> ".
After clone successful your team member will get success message. After that what you need to do first is " git status " . After that create one branch for local github like " local_development " using " git branch local_development ". Then checkout to that local_development using " git checkout local_development " . Now your team member can work on that branch to track his/her code.
If you or your team member need to get the older code that have cloned or coded or other branch code then just checkout to that branch and you will get the exact code of that branch in your source code.
Awesome !!! Now you and your team members can code at same time without any hassle. Happy coding!
Best practices you should follow :
Commit related changes
Commit often
Don't commit half-done work
Test code before you commit
Write good commit message
Use branches
Agree on a workflow
Some exception you will get :
1. Pushing to Git returning Error Code 403 fatal: HTTP request failed
http://stackoverflow.com/questions/7438313/pushing-to-git-returning-error-code-403-fatal-http-request-failed clear will clear the cmd prompt screen
Help & Documentation
Git help on the command line
$git help <command>
Official git website
www.git-scm.com
Free online resources
www.progit.org
bookgit.git-scm.org
www.gitref.org
Monday, July 22, 2013
Sunday, June 30, 2013
Thursday, June 27, 2013
Sunday, May 19, 2013
Friday, May 17, 2013
The POWER in a Millionaire’s Mindset
1. Anything worth doing is worth doing poorly at first.
No one is perfect, not now nor ever will be. It’s not practice that makes perfect – it’s imperfect practice that eventually makes perfect. It’s only natural when you start something new that you do it poorly at first. You may feel inadequate and inferior. Don’t be embarrassed, though. There’s always a price to be paid for success. The trick is to stick with it until you succeed.
2. Don’t be below average, and do below average things. To develop the right mindset you must make personal excellence part of your DAILY routine and overall mission in life. That means doing what others refuse to do. To get the reward you must be willing to take the risk. Let’s start this lesson with the basic understanding of developing a millionaire mindset.
3. "You were born to win, but to be a winner, you must plan to win, prepare to win, and expect to win." Having the right mindset is more important than having the right idea.
4. The people who find true success in life are the ones who, instead of spending all night in front of the TELEVISION, are busy working or improving their skills in some way. Don’t be complacent and just get by.
5. Focus on your own success first.
Don’t hinder your success by worrying about the political, social, and economic issues the world or those around you face. In life, it’s important you take care of yourself first. Do this before you offer your time or effort to others. You’re not being selfish – you’re being practical. The happier you are and the more peace of mind you have, the better equipped you are to help others. So don’t ignore the most important person in your life.
6. Don’t compare yourself to others who are doing better than you.
No matter how successful you become, there will be others “above” you. Don’t waste your time and effort focusing on this sort of thing. It creates jealousy and feelings of inadequacy within you. Focus on yourself.
7. You can achieve anything you believe if you take enough action.
There are people who are better than you at certain things, but we all have that area in which we excel. All skills are learn-able. You may not be the best, but you can improve. If you want something bad enough and are prepared to work for it, you can make it happen.
8. Accept that it requires hard work and in the trenches commitment. It won’t always be 100% enjoyable nothing ever is. “Everybody has talent, but ability takes hard work.” Hard works opens the door to success, and with it comes the freedom to do what you want when you want.
CREDIT : Melissa Krivachek is President of Briella Arion
No one is perfect, not now nor ever will be. It’s not practice that makes perfect – it’s imperfect practice that eventually makes perfect. It’s only natural when you start something new that you do it poorly at first. You may feel inadequate and inferior. Don’t be embarrassed, though. There’s always a price to be paid for success. The trick is to stick with it until you succeed.
2. Don’t be below average, and do below average things. To develop the right mindset you must make personal excellence part of your DAILY routine and overall mission in life. That means doing what others refuse to do. To get the reward you must be willing to take the risk. Let’s start this lesson with the basic understanding of developing a millionaire mindset.
3. "You were born to win, but to be a winner, you must plan to win, prepare to win, and expect to win." Having the right mindset is more important than having the right idea.
4. The people who find true success in life are the ones who, instead of spending all night in front of the TELEVISION, are busy working or improving their skills in some way. Don’t be complacent and just get by.
5. Focus on your own success first.
Don’t hinder your success by worrying about the political, social, and economic issues the world or those around you face. In life, it’s important you take care of yourself first. Do this before you offer your time or effort to others. You’re not being selfish – you’re being practical. The happier you are and the more peace of mind you have, the better equipped you are to help others. So don’t ignore the most important person in your life.
6. Don’t compare yourself to others who are doing better than you.
No matter how successful you become, there will be others “above” you. Don’t waste your time and effort focusing on this sort of thing. It creates jealousy and feelings of inadequacy within you. Focus on yourself.
7. You can achieve anything you believe if you take enough action.
There are people who are better than you at certain things, but we all have that area in which we excel. All skills are learn-able. You may not be the best, but you can improve. If you want something bad enough and are prepared to work for it, you can make it happen.
8. Accept that it requires hard work and in the trenches commitment. It won’t always be 100% enjoyable nothing ever is. “Everybody has talent, but ability takes hard work.” Hard works opens the door to success, and with it comes the freedom to do what you want when you want.
CREDIT : Melissa Krivachek is President of Briella Arion
Monday, March 04, 2013
Augmented Reality (AR) & Develop AR APP in Android
Augmented reality (AR) is a live, direct or indirect, view of a physical, real-world environment whose elements are augmented by computer-generated sensory input such as sound, video, graphics or GPS data. It is related to a more general concept called mediated reality, in which a view of reality is modified (possibly even diminished rather than augmented) by a computer. As a result, the technology functions by enhancing one’s current perception of reality. By contrast, virtual reality replaces the real world with a simulated one.Augmentation is conventionally in real-time and in semantic context with environmental elements, such as sports scores on TV during a match. With the help of advanced AR technology (e.g. adding computer vision and object recognition) the information about the surrounding real world of the user becomes interactive and digitally manipulable. Artificial information about the environment and its objects can be overlaid on the real world.
[Source : Wikipedia] [ More Details]
Augmented Reality Research
CHARIS RESEARCH
Top Rated Games & Apps in AR
The Best Augmented Reality Apps
Augmented Reality
Kick Ass Augmented Reality Mobile Games
Mobile Augmented Reality
Video on AR
Augmented Reality Thesis Video
Developing Apps on AUGMENTED REALITY (AR)
Mobile TutPlus AR TUT
Junaio AR TUT
Wikitude AR TUT
Layar AR TUT
Google AR TUT
Stackover AR Thread
How to work on Junaio for AR:
Help Desk
Setting Junaio
Android Development
[Source : Wikipedia] [ More Details]
Augmented Reality Research
CHARIS RESEARCH
Top Rated Games & Apps in AR
The Best Augmented Reality Apps
Augmented Reality
Kick Ass Augmented Reality Mobile Games
Mobile Augmented Reality
Video on AR
Augmented Reality Thesis Video
Developing Apps on AUGMENTED REALITY (AR)
Mobile TutPlus AR TUT
Junaio AR TUT
Wikitude AR TUT
Layar AR TUT
Google AR TUT
Stackover AR Thread
How to work on Junaio for AR:
Help Desk
Setting Junaio
Android Development
Monday, October 01, 2012
Saturday, August 11, 2012
Difference Between Primary key and Unique key
Primary key and Unique key constraints are important feature in database system. They have some key identity which is important to know.
Unique Key constraints:
Unique key constraint will provide you a constraint like the column values should retain uniqueness.
It will allow null value in the column.
It will create non-clustered index by default
Any number of unique constraints can be added to a table.
Primary Key Constraint:
Primary key will create column data uniqueness in the table.
Primary key will create clustered index by default
Only one Primary key can be created for a table
Multiple columns can be consolidated to form a single primary key
It won't allow null values.
Monday, August 06, 2012
Learn GitHub - Introduction To Git
GitHub is a web-based hosting service for software development project that use the Git revision control system.
It will seems very difficult to co-operate with GitHub with novice people. But after using it, it will seems to you like magic. I hope you know why we will use GitHub!
If you are new to GitHub then below video will help you to start properly.
You can start from book also. There have several book but I will prefer you to start with this book Pro Git.
I hope this video and book will help you.
It will seems very difficult to co-operate with GitHub with novice people. But after using it, it will seems to you like magic. I hope you know why we will use GitHub!
If you are new to GitHub then below video will help you to start properly.
You can start from book also. There have several book but I will prefer you to start with this book Pro Git.
I hope this video and book will help you.
Wednesday, July 11, 2012
Exception "android.os.NetworkOnMainThreadException" !
This is common in android to get error on http or networking connection with this message "android.os.NetworkOnMainThreadException" .
This exception is thrown when an application attempts to perform a networking operation on its main thread .
Run your code in AsyncTask that will solve your problem:
Hints:
Thread msgThread = new Thread(){
public void run(){
http.httpConnectionMsg(nvp,is,msgurl);
}
}
msgThread.start();
Thursday, July 05, 2012
Access localhost/Server on Android device over wifi
Recently in one of my android project I have used XAMPP for database. For accessing database/localhost/server from my application I have use ip address 10.0.2.2 . That is the way for getting localhost from android device. But when I have installed that application in my real device that was unable to get the server . How that will get the server? I have use 10.0.2.2 for http connection . So, getting the server we have to make a connection between android device and our server location. We can do it by connecting with connectify software that will help us to communication device with our server. And in this time have to use in this time the ip address create by WIFI connection as we are creating connection with the server by using wifi.
In this situation I have used cracked "Connectify" so that my android device have the access of my laptop
local network access. In the lite version of connectify you won't get the options for allowing "Local Network Access " .

After establishing connection have to go command prompt . Write "ipconfig" to get the ipv4 address.
In the command prompt which ip address is given , you have you use that ip address in your application for getting the server. (Below red marked line : you have to use that ip address)

Before editing your code you can also check from your android device is it working or not . For that you have to go browser then write the ip address in the url then we will get the localhost.

Set up ADB/Drivers for android Device and Some important Commands
Most people won’t have to use ADB (Android Debug Bridge)
ever, but if you want to learn how or want to get a little more technical with
your Android phone, here’s how to get it set up.
I. Setting Up The SDK
1.
Download the Latest Android SDK from Google
Android SDK (Select
the exe version)
2.
Once downloaded, double click the exe file to open it. (MAKE SURE you change
the directory that it is installing everything to to c:\android-sdk\)
3.
Click on the SDK Manager and it will ask you to install packages. Select the
following and leave all others unchecked:
Android SDK Tools
Android SDK Platform Tools
Google
USB Driver Package, Revision XX (XX being the highest number available)
4.
Then click continue and follow the on screen prompts until all of the packages
are installed and it finishes.
5a.
On your phone, click Settings > Applications > Development and make sure
USB Debugging is on.
5b.
If using Ice Cream Sandwich (Android 4.0), click on Settings > Developer
Options and make sure USB Debugging is on.
6.
Plug your phone into your computer via USB cable (it needs to be on). It should
say installing drivers if using Windows.
7.
Open Windows File Explorer and look for the android-sdk folder inside of the C
drive. Then open the platform-tools folder inside that. Now, hold the shift key
down on your keyboard and right click in any blank area inside that folder.
This will give you the option to open a command window here. Select that and a
command prompt will open saying c:\android-sdk\platform-tools\
*if using windows XP, this won’t work. So instead open command prompt
first by going to Start > Run > then typing in cmd and hitting enter.
Then type cd c:\android-sdk\platform-tools\ and hit enter, then continue.
8.
Type the following into the command prompt window (hitting enter at the end of
every line):
adb
devices
You
should see a serial number pop up, it’s the serial number of your phone. This
means you are all set!
If
you do NOT see a serial number, then we need to reinstall the drivers manually
in Section II below.
II. IF DRIVERS JUST WON’T AUTOMATICALLY INSTALL, DO IT
MANUALLY HERE
1.
A program called PDANet (used normally to allow you to wired tether your
phone’s internet to your computer) can be used to install the ADB drivers for a
lot of phones. Download it and follow it’s instructions to install it then go
back to step 8 in Section I above and see if that gets you the serial number
(if you do, you are all done). If not, then use one of the device specific
programs below in step 2.
2.
Download your phone’s driver’s below then goto your Device Manager on your
computer, look for the phone and click on it. Then click Properties > Update
Driver > Browse > Let me pick > Computer > Have Disk > Browse
> Then select the driver you downloaded below:
Universal
Motorola Drivers (unzip the file once you download it, and run
the program inside to install the drivers)(Updated 09.27.10)
Motorola
Droid Drivers (unzip the file once you download it).
Motorola
Milestone Drivers (follow the instructions on the page).
Motorola
CLIQ Drivers (follow the instructions on the page).
Samsung
Behold 2 Drivers (unzip the file, run the setup.exe) (If you
have Windows 64Bit, you CANNOT install the Behold Drivers. Find someone with a
32Bit system to to any Behold 2 procedures involving ADB).
If
using a Samsung device, try downloading Samsung Kies and installing that then plugging in
your device and trying again.
V. Some Common ADB/Fastboot Commands
ADB Commands
adb devices – lists which
devices are currently attached to your computer
adb install
<packagename.apk> – lets you install an Android application on your phone
adb remount – Remounts your
system in write mode – this lets you alter system files on your phone using ADB
adb push <localfile>
<location on your phone> – lets you upload files to your phones filesystem
adb pull <location on your
phone> <localfile> – lets you download files off your phones
filesystem
adb logcat – starts dumping
debugging information from your handset to the console – useful for debugging
your apps
adb shell <command> –
drops you into a basic linux command shell on your phone with no parameters, or
lets you run commands directly
adb
devices – lists which devices are currently attached to your computer
adb
install <packagename.apk> – lets you install an Android application on
your phone
adb
remount – Remounts your system in write mode – this lets you alter system files
on your phone using ADB
adb
push <localfile> <location on your phone> – lets you upload files
to your phones filesystem
adb
pull <location on your phone> <localfile> – lets you download files
off your phones filesystem
adb
logcat – starts dumping debugging information from your handset to the console
– useful for debugging your apps
adb
shell <command> – drops you into a basic linux command shell on your
phone with no parameters, or lets you run commands directly
Fastboot
Commands
fastboot
devices – lists which devices in fastboot mode are currently attached to your
computer
fastboot
boot <filename> – boots a rom stored on your pc specified by the filename
fastboot flash <partition>
<filename> – flashes a rom stored on your pc, partition can be one
of
{boot, recovery, system, userdata}
For
farther information you can visit Android Debug Bridge.
Tuesday, July 03, 2012
Using Placeholder or parameter markers for preventing sql injection in PHP
public static function getMembers($startRow,$numRows,$order){
$sql = “SELECT SQL_CALC_FOUND_ROWS * FROM “ . TBL_MEMBERS . “ ORDER BY $order LIMIT :startRow, :numRows”;
}
:startRow and :numRows are called placeholders or parameter markers.
They serve two purposes.
First of all, they let you prepare — that is, get MySQL to parse — a query once, then run it multiple
times with different values. If you need to run the same query many times using different input
values -- when inserting many rows of data, for instance -- prepared statement can really speed up execution.
Secondly, they reduce the risk of so-called SQL injection attacks. For example, an alternative to using
placeholders might be to write:
$sql = “SELECT SQL_CALC_FOUND_ROWS * FROM “ . TBL_MEMBERS . “ ORDER BY $order LIMIT $startRow, $numRows”;
However, imagine that, due to insufficient checking of user input, a malicious user managed to set
$numRows to “1; DELETE FROM members”.
This would run the query as intended, but it would also run the second statement, which would delete all records from your members table!
When you use placeholders, you pass data to the query via PDO (as you see shortly), not directly into
your query string. This allows PDO to check the passed data to ensure that it only contains what it’s supposed to contain(integers in this case).
Next, the two :startRow and :numRow placeholders you created earlier are populated with the actual data from the $startRow and $numRow variables:
$st->bindValue( “:startRow”, $startRow, PDO::PARAM_INT );
$st->bindValue( “:numRows”, $numRows, PDO::PARAM_INT );
The PDOStatement::bindValue() method takes three arguments:
the name of the placeholder to bind,
the value to use instead of the placeholder,
and the data type of the value (PDO::PARAM_INT, or integer, in this case).
By specifying the data type, PDO can ensure that the correct type of data is passed to MySQL. In addition, PDO automatically escapes any quote marks and other special characters in the data.(Failing to escape special characters is another common cause of SQL injection vulnerabilities.)
Some other common data types that you can use include:
PDO::PARAM_BOOL — A Boolean data type
PDO::PARAM_NULL — The NULL data type
PDO::PARAM_STR — A string data type. (This is the default if you don’t specify a type.)
PDO::PARAM_LOB — A LOB data type, such as BLOB or LONGBLOB
Why use LIKE instate of using loop in PHP ?
We know LIMIT counts from the first row of the results. However, by including two numbers after the
LIMIT keyword, separated by a comma, you can specify both the row from which to start returning
results, as well as the number of results to return:
mysql> SELECT id, username FROM members LIMIT 1, 2;
| id | username |
-------------------
2 ron
3 anjan
Notice that the start row counts from zero, so 1 is actually the second row (ron).
You might be wondering what the point of LIMIT is, because you can always just loop through the result set in PHP to extract only the rows you’re interested in. The main reason to use LIMIT is that it reduces the amount of data that has to flow between MySQL and your PHP script.
Imagine that you want to retrieve the first 100 rows of a million-row table of users. If you use LIMIT
100, only 100 rows are sent to your PHP script. However, if you don’t use a LIMIT clause (and your
query also contains no WHERE clause), all 1,000,000 rows of data will be sent to your PHP script, where they will need to be stored inside a PDOStatement object until you loop through them to extract the first 100. Storing the details of a million users in your script will quickly bring the script to a halt, due to the large amount of memory required to do so.
LIMIT is particularly useful when you’re building a paged search function in your PHP application. For example, if the user requests the second page of search results, and you display 10 results per page, you can use SELECT ... LIMIT 10, 10 to retrieve the second page of results.
Some Important Attributes in Mysql
There have some most important attributes in mysql which can solve/get the solution of our faced scenery. So, we should keep in mind that those we can do by using default attribute of mysql.
BINARY Attribute
All character data types have a collation that is used to determine how characters in the field are
compared. By default, a character field’s collation is case insensitive. This means that, when you sort the column alphabetically (which you learn to do shortly), “a” comes before both “b” and “B”. It also means that queries looking for the text “banana” will match the field values “banana” and “Banana”.
However, by adding the BINARY attribute after the data type definition, you switch the field to a binary collation, which is case sensitive; when sorting, “a” comes before “b”, but “B” comes before “a” (because, generally speaking, uppercase letters come before lowercase letters in a character set). Furthermore, this means that matches are case sensitive too; “banana” will only match “banana”, not “Banana”. In this case, you created the username field of the members table with the BINARY attribute, making it case sensitive:
username VARCHAR(30) BINARY NOT NULL UNIQUE,
This ensures that there’s no ambiguity over the case of the letters in each user ’s username; for example,
“shaon” is a different username than “Shaon”. This is important because many people choose usernames where the case of the username’s characters is significant to them. If they created their account with a username of “shaon”, and later found out they could also login using “Shaon”, they might wonder if they were working with one account or two!
ENUM Data Type
Enumeration columns is a type of string column where only predefined string values are allowed in the field .
Suppose we want user can input only 'm' or 'f' for their gender then we have to use:
gender ENUM ('m', 'f'),
or their favorite subject to read:
subject ENUM( 'JAVA','PHP','CEH'),
TIMESTAMP Data Type
Another most important data type is TIMESTAMP data type which can get the result exactly what you need. It is a bit different from the other date/time types in that it can automatically record the time that certain event occur. For example, when you add a new row to a table containing a TIMESTAMP column, the field stores the time that the insertion took place. Similarly, whenever a row is updated, the TIMESTAMP field is automatically updated with the time of the update.
The other point to remember about TIMESTAMP fields is that they store the date and time in the UTC
(Universal Coordinated Time) time zone, which is essentially the same as the GMT time zone. This
probably won’t affect you much, because MySQL automatically converts TIMESTAMP values between UTC and your server ’s time zone as required. However, bear in mind that if you store a TIMESTAMP value in a table, and you later change the server ’s time zone, the value that you get back from the TIMESTAMP field will be different.
A TIMESTAMP field is great for tracking things such as when a record was last created or updated,
because you don’t have to worry about setting or changing its value; it happens automatically. In this
example, you created a TIMESTAMP field in the accessLog table to track when the last access was made:
lastAccess TIMESTAMP NOT NULL,
BINARY Attribute
All character data types have a collation that is used to determine how characters in the field are
compared. By default, a character field’s collation is case insensitive. This means that, when you sort the column alphabetically (which you learn to do shortly), “a” comes before both “b” and “B”. It also means that queries looking for the text “banana” will match the field values “banana” and “Banana”.
However, by adding the BINARY attribute after the data type definition, you switch the field to a binary collation, which is case sensitive; when sorting, “a” comes before “b”, but “B” comes before “a” (because, generally speaking, uppercase letters come before lowercase letters in a character set). Furthermore, this means that matches are case sensitive too; “banana” will only match “banana”, not “Banana”. In this case, you created the username field of the members table with the BINARY attribute, making it case sensitive:
username VARCHAR(30) BINARY NOT NULL UNIQUE,
This ensures that there’s no ambiguity over the case of the letters in each user ’s username; for example,
“shaon” is a different username than “Shaon”. This is important because many people choose usernames where the case of the username’s characters is significant to them. If they created their account with a username of “shaon”, and later found out they could also login using “Shaon”, they might wonder if they were working with one account or two!
ENUM Data Type
Enumeration columns is a type of string column where only predefined string values are allowed in the field .
Suppose we want user can input only 'm' or 'f' for their gender then we have to use:
gender ENUM ('m', 'f'),
or their favorite subject to read:
subject ENUM( 'JAVA','PHP','CEH'),
TIMESTAMP Data Type
Another most important data type is TIMESTAMP data type which can get the result exactly what you need. It is a bit different from the other date/time types in that it can automatically record the time that certain event occur. For example, when you add a new row to a table containing a TIMESTAMP column, the field stores the time that the insertion took place. Similarly, whenever a row is updated, the TIMESTAMP field is automatically updated with the time of the update.
The other point to remember about TIMESTAMP fields is that they store the date and time in the UTC
(Universal Coordinated Time) time zone, which is essentially the same as the GMT time zone. This
probably won’t affect you much, because MySQL automatically converts TIMESTAMP values between UTC and your server ’s time zone as required. However, bear in mind that if you store a TIMESTAMP value in a table, and you later change the server ’s time zone, the value that you get back from the TIMESTAMP field will be different.
A TIMESTAMP field is great for tracking things such as when a record was last created or updated,
because you don’t have to worry about setting or changing its value; it happens automatically. In this
example, you created a TIMESTAMP field in the accessLog table to track when the last access was made:
lastAccess TIMESTAMP NOT NULL,
Subscribe to:
Posts (Atom)